

I happen to have three of Verizon’s LTE devices. The first was the Pantech UML290which I am using on my MacBook Air.
The second device is the HTC Thunderbolt. Lastly is the Samsung SCH-LC11 mobile hot spot, which arrived today. I decided to take them all for a spin and see how they stack up against each other. By far the Pantech is the speed demon of the bunch when it comes to laptop connectivity. I was careful on how I worded that because according to Speedtest.net the Thunderbolt is the beast of them all, however those numbers fall quickly when using it’s hot spot ability. I also think that there is something off with Speedtest.net’s android app. The numbers are off especially the upload side of things. Continue reading “Speed Testing Verizon's LTE Devices”
Verizon 4G LTE Pantech UML290
I recently ordered a Pantech UML290 from Verizon to test out their LTE service. I was skeptical to say the least about speeds being reported from other users. I live just north of New York City and I achieved downloads speeds up to 25Mbps and upload speeds up to 8Mbps via Speedtest.net. I have had data service with AT&T for several years. With the speeds I am getting with Verizon’s LTE service, I canceled my data service with AT&T. I am still holding out for a LTE Hotspot device, I will replace my Pantech device once that arrives. For now enjoy the screencast of my initial speed tests.
MacBook Pro With Two Hard Drives
I decided to add a second hard drive to my 17” Unibody MacBook Pro. To do this I purchased an OptiBay adapter from MCE Technologies. This adapter replaces the built DVD drive in the MacBook Pro. I rarely use it so it is no big loss to remove it. In doing so I gain another 500GB of storage bringing my total storage to 1TB. MCE Technologies also sells an enclosure which allows the DVD drive you removed to be used as external USB drive. I happened to purchase the OptiBay while they were giving away this enclosure for free with purchase.
Continue reading “MacBook Pro With Two Hard Drives”
ALIX Monowall Firewall – Part 2
This tutorial covers the post installation basic configuration of Monowall (M0n0wall). This segment covers changing the default password, setting the time zone of the firewall. It also covers setting static IP address mappings via DHCP as well as configuring port forwarding. This is the second part in a series of tutorials which will range from basic configuration of the firewall to more advanced topics such as IPSEC tunnels and VPN clients.
Log into the firewall

Open a web browser and log in to the firewall. The default address is http://192.168.1.1. The username is: admin and the default password is: mono
Change password & time zone
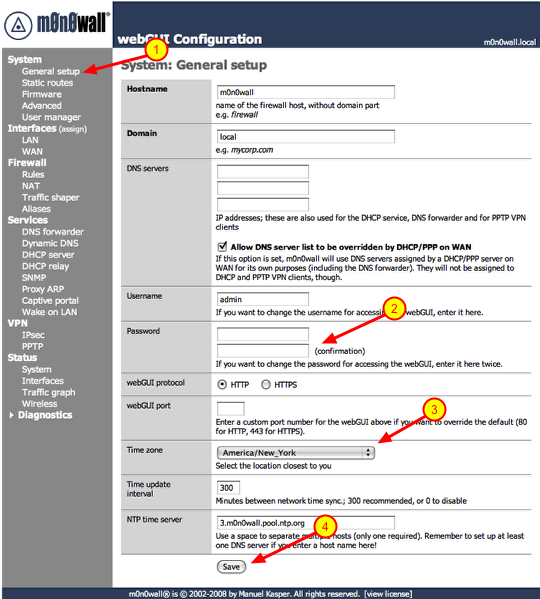
1.) Click on ‘General Setup’ under ‘System’
2.) Type in a new password in both boxes. As a general rule of thumb you should you upper and lowercase characters as well as symbols.
3.) Select the time zone you are in.
4.) Click the ‘Save’ button.
After you click save the firewall will prompt you to log back in with the new password.
2.) Type in a new password in both boxes. As a general rule of thumb you should you upper and lowercase characters as well as symbols.
3.) Select the time zone you are in.
4.) Click the ‘Save’ button.
After you click save the firewall will prompt you to log back in with the new password.
Open the DHCP server configuration page
If you are going to access any devices on your local network via the Internet you need assign them static IP addresses. This is important if you’re going to log into your workstation remotely via a service like ‘Back To My Mac’, connect to a SlingBox remotely or play video games via a PC, Xbox360 or a PS3. This will become clear when we start configuring Port ‘Forwarding’. So let’s get started on assigning IP addresses to these devices. For this example we are going to assign a static IP to the workstation connected to the firewall. We will need to know the MAC address of the device, this is the physical address of the network interface. On some devices you will see a sticker which states the MAC address of the device, on others you will have to go into a configuration or information screen to gather that information. The MAC address will be in the following format ##:##:##:##:##:##, it will be a combination of numerals and characters. On a Mac you would click on the Apple logo on the menu-bar, go to ‘About This Mac’, ‘More Info..” and click on ‘Network’. You will see the different available network interfaces, click on the network interface in question and you will see the MAC address of the interface. So now that you have the needed information, lets proceed.
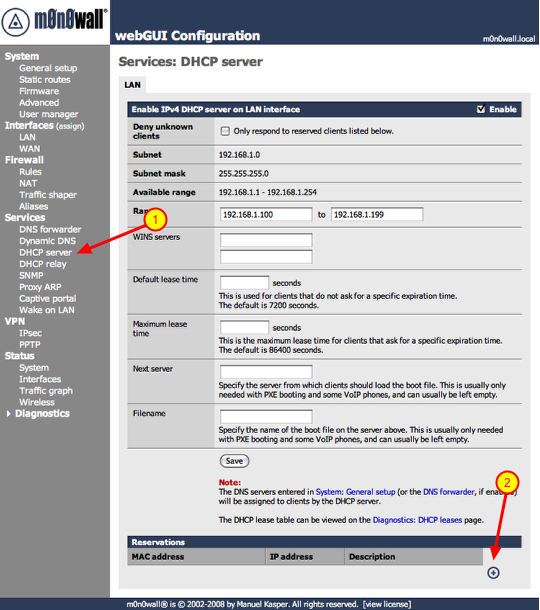
Also the static IPs have to be outside the range of IPs given out by the DHCP server. The default range is 100 – 199, keep that in mind.
1.) Click ‘DHCP server’ under the ‘Services’ section
2.) Click the ‘+’ symbol under the ‘Reservations’ section
Also the static IPs have to be outside the range of IPs given out by the DHCP server. The default range is 100 – 199, keep that in mind.
1.) Click ‘DHCP server’ under the ‘Services’ section
2.) Click the ‘+’ symbol under the ‘Reservations’ section
Add static IP address mapping
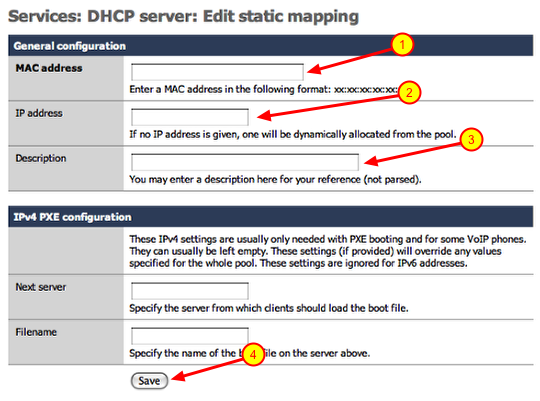
1.) Enter the MAC address of the device you are adding
2.) Enter the IP address you would like to assign to the device. (i.e.. 192.168.1.200) Make sure the IP address falls within the range of your local network.
3.) Enter a description for the device you are adding a static mapping to and click save.
Repeat these steps for every device you need to add. Once you are done continue to the next section.
Apply changes, beware of the bugs though
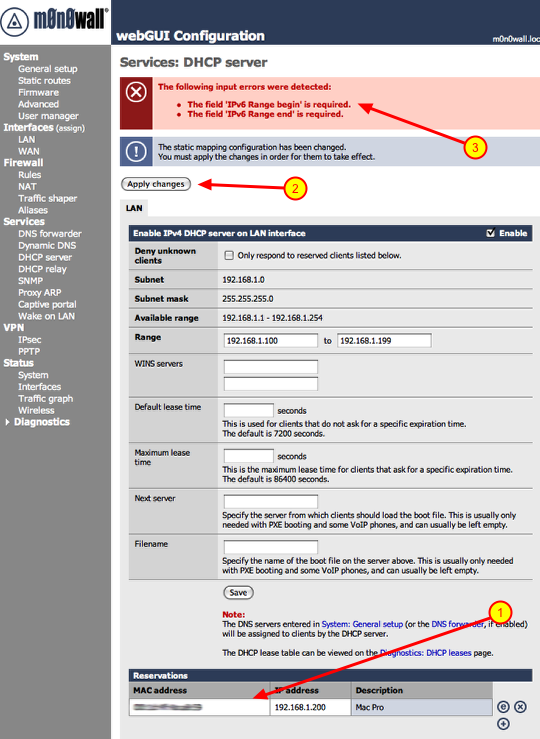
1.) You will notice your new reservations listed below.
2.) Click the ‘Apply changes’ button.
3.) If you are installing 1.3 version you will see the above error. This is a bug in that version, it will be fixed in the next revision.
**If you do get this error after clicking ‘Apply changes’, you need to reboot the firewall. To do that click ‘Reboot system’ under the ‘Diagnostics’ section. Once you do that the changes will take affect.
Port forwarding
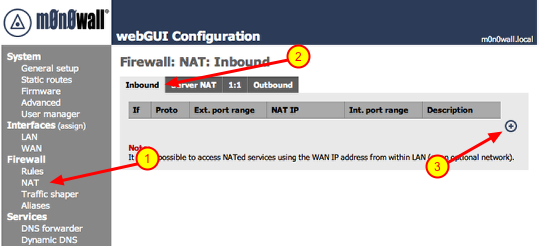
1.) Click on ‘NAT’ under Firewall
2.) Make sure ‘Inbound’ is selected
3.) Click the ‘+’ symbol
2.) Make sure ‘Inbound’ is selected
3.) Click the ‘+’ symbol
Adding port forwarding rule
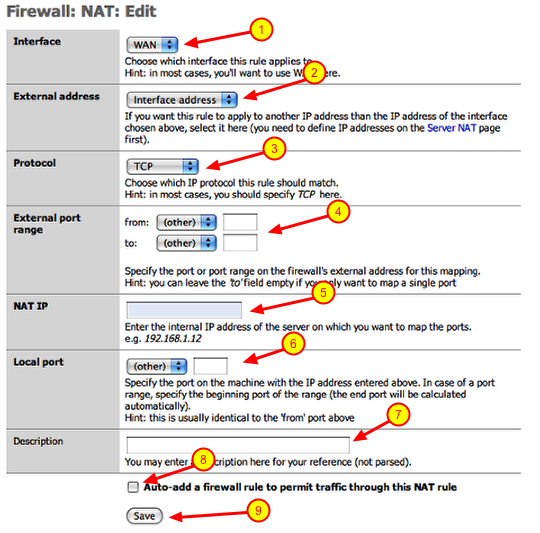
I am going to create a port forwarding rule as if I had a SlingBox on my local network. SlingBox uses TCP port 5001 to communicate with the Internet. So I am going to configure a rule that states and traffic coming in on the WAN port (Internet interface) on TCP port 5001 be forwarded to an IP address on my local network. These are the steps to achieve that:
1.) Interface: should point to WAN
2.) External address: should point to ‘interface address’
3.) Protocol: select the appropriate protocol from the drop down (i.e.. TCP)
4.) External port range: enter the port number in both boxes (i.e.. 5001)
5.) NAT IP: this would be the IP address of the device on your local network (i.e.. 192.168.1.200)
6.) Local port: this would be the same port number used in step 4 (i.e.. 5001)
7.) Description: enter a thorough description of the device and port number you are forwarding for future reference
8.) Click the checkbox: This will automatically create the firewall rule you will need at the same time.
9.) Click the ‘Save’ button
Repeat these steps if you have multiple ports you have to open for a device. Also repeat these steps if you have multiple devices to add.
Apply changes

Once you are finished adding all of you port forwards, you can click on the ‘Apply changes’ button and you are done
Ports for forwarding common devices
Xbox360 Live: UDP/TCP 3074
PS3: TCP 5223, UDP 3478. UDP 3479, UDP 3658 **Certain games may require additional port forward mappings, check with game vendor
SlingBox: TCP 5001
If you need information on ports for device not listed here, check with the manufacturers support web page. If you cannot find it there try Googling: firewall port forwarding for (then add your device and then hit the ‘Search’ button)
Finished
We are done with this segment of the tutorial. In the next installment we will discuss Dynamic DNS services and VPN Tunnels (IPsec Mobile, PPTP).
ALIX Monowall Firewall – Part 1
This tutorial covers the installation of Monowall (M0n0wall) onto a compact flash card utilizing a Mac and assembling the firewall. The firewall is being built utilizing an ALIX embedded system. This is the first part in a series of tutorials which will range from basic configuration of the firewall to more advanced topics such as IPSEC tunnels and VPN clients.
Download the Monowall embedded image file
Visit Monowall’s website and download the embedded image file for ALIX. Below is a link to the appropriate page.
Monowall Download Page: http://m0n0.ch/wall/beta.php
Place the file you just downloaded onto your desktop.
Monowall Download Page: http://m0n0.ch/wall/beta.php
Place the file you just downloaded onto your desktop.
Run Disk Utility
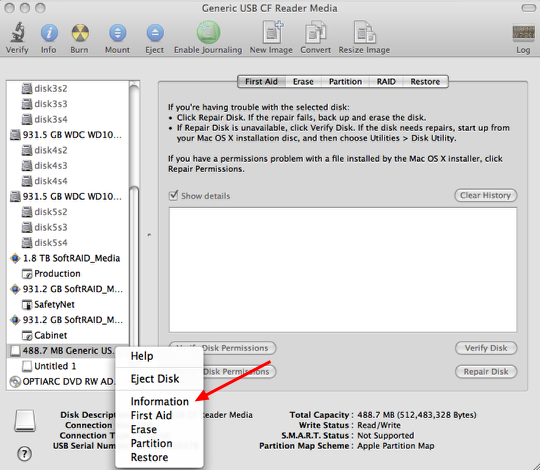
Insert a compact flash card into a card reader attached to your computer, a 256MB card will do just fine. Open up ‘Disk Utility’ which is located in the ‘Utilities’ folder under ‘Applications’ on your boot drive. Select the Compact Flash card you inserted on the right side. Make sure that you select the right drive, double check to make sure the size matches the card. Be very careful, if you select the wrong drive you could wipe all the information from a hard drive. Right-Click on the drive and select information.
Compact Flash Disk ID
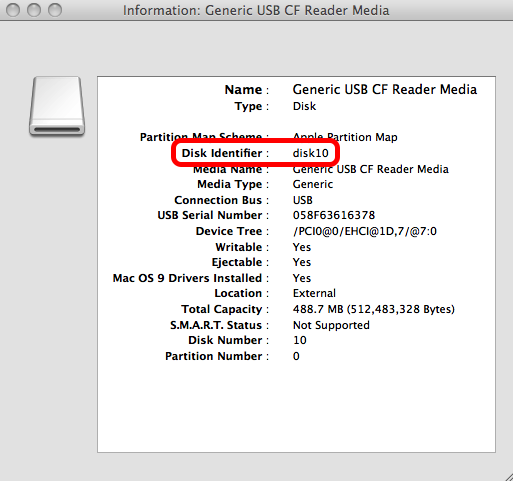
Jot down the the ‘Disk Identifier’ information associated with the drive. This number will vary on your own system so do not use the information listed above. Writing the wrong information down could result in one of your hard drives being wiped so pay very close attention. You will need this information for the next step.
Partition Mounted?
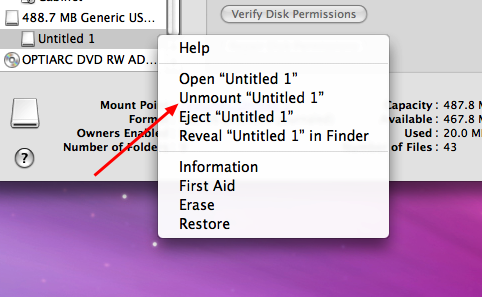
If there is a partition on the Compact Flash Card it needs to be unmounted. Right-Click on the partition listed underneath Compact Flash Card and select ‘Unmount’.
Run Terminal
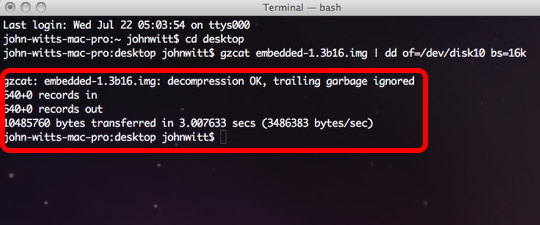
When you open Terminal it will default to your home directory. Issue the following commands to change to the desktop directory and write out the image file to the Compact Flash Card:
cd desktop
gzcat embedded-1.3b16.img | dd of=/dev/disk# bs=16k (Insert the Disk ID number that you jotted down from the previous step) Last warning if you enter the wrong information you could wipe a hard drive or other removable drive connected to your system)
You should receive a message as displayed above. If you receive a message that states the resource is busy, it means that you did not unmount a partition on the Compact Flash Card. Please go back to the previous step and unmount the partition.
Assemble the firewall

Remove the the Compact Flash Card from the card reader and insert it into the card slot on the ALIX board. Do this before you install it into the case as it will block the slot. This would also be good time to install any add in cards you might have into the mini-pci slots (wifi, vpn accelerator) Remove the hex bolts on both sides of the serial port, otherwise you cannot slip it into the case. Slide the board with the network ports going in first so they slide into the cutouts. With that inserted screw in the board to case, followed by reattaching the the hex bolts on the both sides of the serial port. Put the cover on the case and screw it in place. Thats all there is to it, pretty simple wouldn’t you say?
Log into the firewall
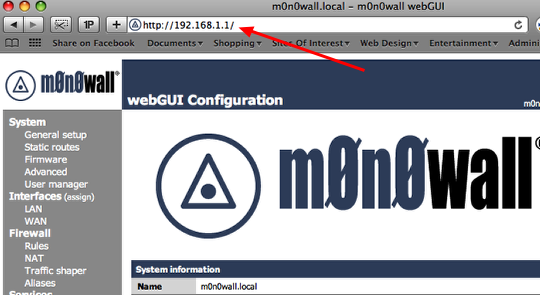
Plug your firewall into the network utilizing the LAN port and power up the unit. You can either plug the firewall into a switch or directly into your network port on your computer. The DHCP server on the firewall will supply your workstation with the appropriate IP address information. Give it a couple of minutes to finish booting up. Open up your favorite browser and type: http://192.168.1.1 into the address bar. This is the default address of the firewall. You will be prompted to login into the firewall, the following are the default credentials:
Username: admin
Password: mono
This information is case sensitive, make sure you enter everything in lower case.
That is it for the first part of the tutorial. The next tutorial will walk you through the basic configuration if the firewall. Subsequent tutorials will discuss more advanced features, such as creating tunnels between two remote firewalls.