
A couple of weeks ago I had an amazing round of Domination on Call of Duty Modern Warfare 3, I went 64 and 0. This allowed me to get 25 unassisted kills, thus giving me a MOAB. Attached is the video of the match. I had to speed it up to allow the entire video to be created within COD’s video creation tools. Enjoy
Speed Testing Verizon's LTE Devices

I happen to have three of Verizon’s LTE devices. The first was the Pantech UML290which I am using on my MacBook Air.
The second device is the HTC Thunderbolt. Lastly is the Samsung SCH-LC11 mobile hot spot, which arrived today. I decided to take them all for a spin and see how they stack up against each other. By far the Pantech is the speed demon of the bunch when it comes to laptop connectivity. I was careful on how I worded that because according to Speedtest.net the Thunderbolt is the beast of them all, however those numbers fall quickly when using it’s hot spot ability. I also think that there is something off with Speedtest.net’s android app. The numbers are off especially the upload side of things. Continue reading “Speed Testing Verizon's LTE Devices”
Verizon 4G LTE Pantech UML290
I recently ordered a Pantech UML290 from Verizon to test out their LTE service. I was skeptical to say the least about speeds being reported from other users. I live just north of New York City and I achieved downloads speeds up to 25Mbps and upload speeds up to 8Mbps via Speedtest.net. I have had data service with AT&T for several years. With the speeds I am getting with Verizon’s LTE service, I canceled my data service with AT&T. I am still holding out for a LTE Hotspot device, I will replace my Pantech device once that arrives. For now enjoy the screencast of my initial speed tests.
Twitter & WordPress Integration
With the new updates to Twitter, I had to update Twitter Tools. It requires registration of your app on Twitter’s website. Once you do this a set of tokens are created which you paste into the Twitter Tools plug-in.
Padster
I just recently purchased the Padster for my iPad, it is replacing a bag I just bought from Booq. The Padster is bag specifically designed for an iPad. Let me start by saying I utterly love my Booq bags, I own three of them for my 17″ Macbook Pro. The problem I had with my Booq Taipan Shadow XS is that it is way too small in every aspect. The compartment that holds the iPad is too restrictive, you can only really use it with a naked iPad (no case). We all know how slippery a naked iPad is, your just asking to drop it. With the iPad in, there is little space for anything else. It is a really tight bag with a shoulder strap that is way to short. It is so short you can only put the strap on your shoulder, you can forget about slinging it over your neck. I already have my RMA and it is going back to Booq.
Continue reading “Padster”
Site Overhaul
I have not been pleased with the recent site redesign and have decided to do a complete overhaul of the site. The redesign will happen over this Memorial day weekend starting today. The site will be available throughout this undertaking, however at times the layout will be off somewhat. Please bear with us during this process and we will try to make this as quick and painless as possible for you, our followers.
Thank You
Hiatus

Please forgive my prolonged absence. Just before Christmas I left for California to visit my family and relax with my wife afterwards in Santa Monica. I did not get back until after the New Year and then I ran into health issues with one of our cats. He was diagnosed with diabetes and we are now giving him 2 shots daily. Work has been very taxing over the past several months as well. I am now getting back to my normal grove and will begin updating the site shortly. I am working on the next installment on the firewall tutorials, expect one within the next couple of weeks.
Once again sorry for my long hiatus.

MacBook Pro With Two Hard Drives
I decided to add a second hard drive to my 17” Unibody MacBook Pro. To do this I purchased an OptiBay adapter from MCE Technologies. This adapter replaces the built DVD drive in the MacBook Pro. I rarely use it so it is no big loss to remove it. In doing so I gain another 500GB of storage bringing my total storage to 1TB. MCE Technologies also sells an enclosure which allows the DVD drive you removed to be used as external USB drive. I happened to purchase the OptiBay while they were giving away this enclosure for free with purchase.
Continue reading “MacBook Pro With Two Hard Drives”
Vibram Five Fingers
 Well, I pulled the trigger today. I found a store in the city that carries Vibram Five Finger shoes. I was unsure if I should order them online because I have big feet (size 14.5) and their sizing is unconventional. I believe the sizing is based on the european metric system. My right foot is a little smaller so I bought two different sizes for a better fit. They fit very well and I kept them on since I left the store so I can get used to them. My feet are feeling some what tired and sore. I was expecting that after doing a vast amount of research on them before the purchase. Basically when you start running around barefoot which is what you are basically doing, you are using a lot of muscles that you haven’t used in a long time. I will give them a couple of days of use before I chime in with my verdict. When I do give my verdict it will be via an update on this post.
![Reblog this post [with Zemanta]](http://img.zemanta.com/reblog_e.png?x-id=d5e18349-305c-424d-8ed6-6e9cb939bb1c)
ALIX Monowall Firewall – Part 2
This tutorial covers the post installation basic configuration of Monowall (M0n0wall). This segment covers changing the default password, setting the time zone of the firewall. It also covers setting static IP address mappings via DHCP as well as configuring port forwarding. This is the second part in a series of tutorials which will range from basic configuration of the firewall to more advanced topics such as IPSEC tunnels and VPN clients.
Log into the firewall

Open a web browser and log in to the firewall. The default address is http://192.168.1.1. The username is: admin and the default password is: mono
Change password & time zone
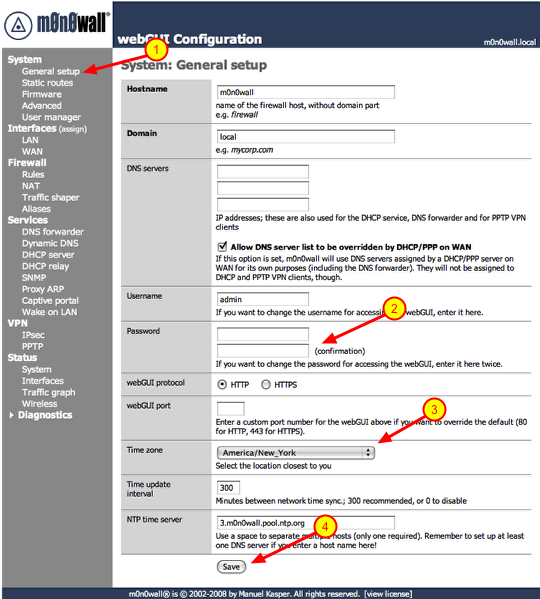
1.) Click on ‘General Setup’ under ‘System’
2.) Type in a new password in both boxes. As a general rule of thumb you should you upper and lowercase characters as well as symbols.
3.) Select the time zone you are in.
4.) Click the ‘Save’ button.
After you click save the firewall will prompt you to log back in with the new password.
2.) Type in a new password in both boxes. As a general rule of thumb you should you upper and lowercase characters as well as symbols.
3.) Select the time zone you are in.
4.) Click the ‘Save’ button.
After you click save the firewall will prompt you to log back in with the new password.
Open the DHCP server configuration page
If you are going to access any devices on your local network via the Internet you need assign them static IP addresses. This is important if you’re going to log into your workstation remotely via a service like ‘Back To My Mac’, connect to a SlingBox remotely or play video games via a PC, Xbox360 or a PS3. This will become clear when we start configuring Port ‘Forwarding’. So let’s get started on assigning IP addresses to these devices. For this example we are going to assign a static IP to the workstation connected to the firewall. We will need to know the MAC address of the device, this is the physical address of the network interface. On some devices you will see a sticker which states the MAC address of the device, on others you will have to go into a configuration or information screen to gather that information. The MAC address will be in the following format ##:##:##:##:##:##, it will be a combination of numerals and characters. On a Mac you would click on the Apple logo on the menu-bar, go to ‘About This Mac’, ‘More Info..” and click on ‘Network’. You will see the different available network interfaces, click on the network interface in question and you will see the MAC address of the interface. So now that you have the needed information, lets proceed.
Also the static IPs have to be outside the range of IPs given out by the DHCP server. The default range is 100 – 199, keep that in mind.
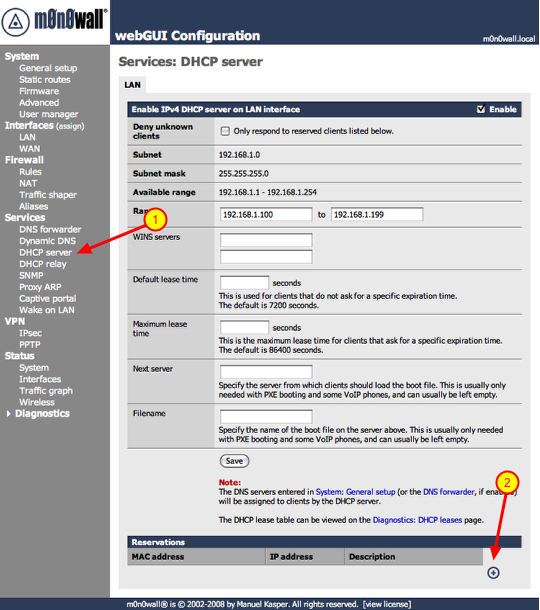
1.) Click ‘DHCP server’ under the ‘Services’ section
2.) Click the ‘+’ symbol under the ‘Reservations’ section
Also the static IPs have to be outside the range of IPs given out by the DHCP server. The default range is 100 – 199, keep that in mind.
1.) Click ‘DHCP server’ under the ‘Services’ section
2.) Click the ‘+’ symbol under the ‘Reservations’ section
Add static IP address mapping
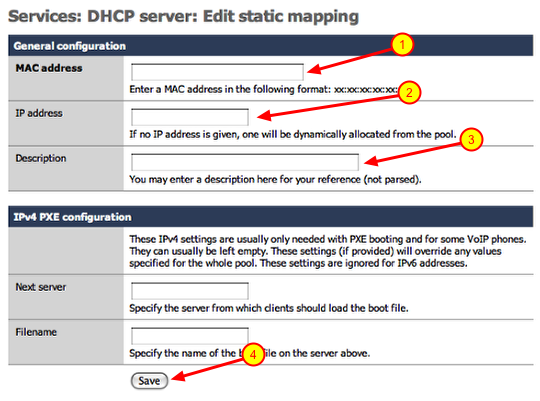
1.) Enter the MAC address of the device you are adding
2.) Enter the IP address you would like to assign to the device. (i.e.. 192.168.1.200) Make sure the IP address falls within the range of your local network.
3.) Enter a description for the device you are adding a static mapping to and click save.
Repeat these steps for every device you need to add. Once you are done continue to the next section.
Apply changes, beware of the bugs though
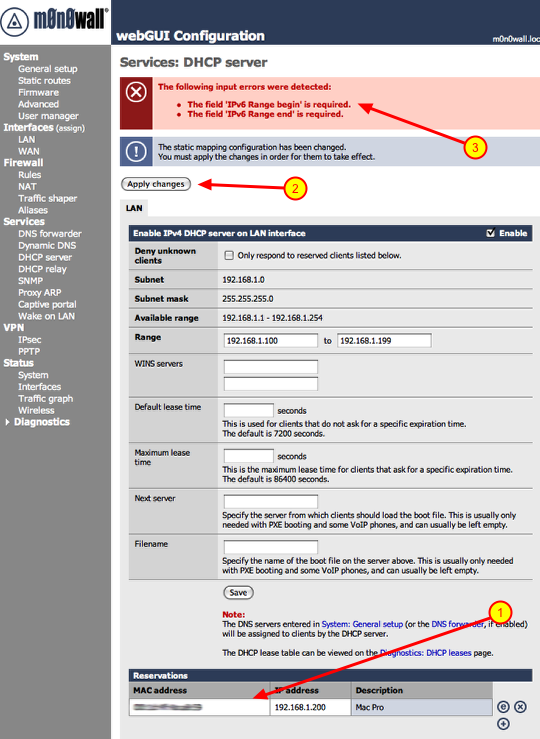
1.) You will notice your new reservations listed below.
2.) Click the ‘Apply changes’ button.
3.) If you are installing 1.3 version you will see the above error. This is a bug in that version, it will be fixed in the next revision.
**If you do get this error after clicking ‘Apply changes’, you need to reboot the firewall. To do that click ‘Reboot system’ under the ‘Diagnostics’ section. Once you do that the changes will take affect.
Port forwarding
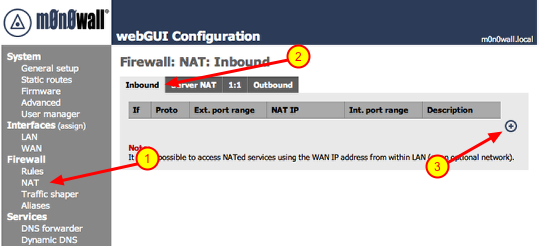
1.) Click on ‘NAT’ under Firewall
2.) Make sure ‘Inbound’ is selected
3.) Click the ‘+’ symbol
2.) Make sure ‘Inbound’ is selected
3.) Click the ‘+’ symbol
Adding port forwarding rule
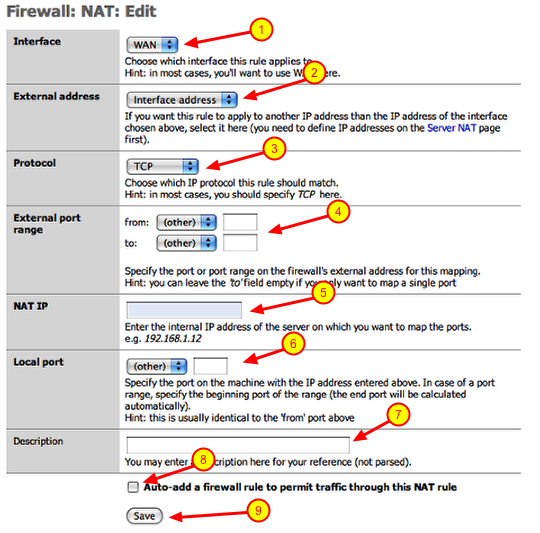
I am going to create a port forwarding rule as if I had a SlingBox on my local network. SlingBox uses TCP port 5001 to communicate with the Internet. So I am going to configure a rule that states and traffic coming in on the WAN port (Internet interface) on TCP port 5001 be forwarded to an IP address on my local network. These are the steps to achieve that:
1.) Interface: should point to WAN
2.) External address: should point to ‘interface address’
3.) Protocol: select the appropriate protocol from the drop down (i.e.. TCP)
4.) External port range: enter the port number in both boxes (i.e.. 5001)
5.) NAT IP: this would be the IP address of the device on your local network (i.e.. 192.168.1.200)
6.) Local port: this would be the same port number used in step 4 (i.e.. 5001)
7.) Description: enter a thorough description of the device and port number you are forwarding for future reference
8.) Click the checkbox: This will automatically create the firewall rule you will need at the same time.
9.) Click the ‘Save’ button
Repeat these steps if you have multiple ports you have to open for a device. Also repeat these steps if you have multiple devices to add.
Apply changes

Once you are finished adding all of you port forwards, you can click on the ‘Apply changes’ button and you are done
Ports for forwarding common devices
Xbox360 Live: UDP/TCP 3074
PS3: TCP 5223, UDP 3478. UDP 3479, UDP 3658 **Certain games may require additional port forward mappings, check with game vendor
SlingBox: TCP 5001
If you need information on ports for device not listed here, check with the manufacturers support web page. If you cannot find it there try Googling: firewall port forwarding for (then add your device and then hit the ‘Search’ button)
Finished
We are done with this segment of the tutorial. In the next installment we will discuss Dynamic DNS services and VPN Tunnels (IPsec Mobile, PPTP).